template-documentation-markdown
Requirements: Project Name: Version #1
Developing the capstone project will require you to create a requirements document first and the project itself second. The requirements document is the equivalent of an architect’s blueprint: it is your plan for what you will execute before you do so. While you may be tempted to develop the project without a plan – this is not allowed. The more detailed and complete your requirements document the easier it will be to create your capstone project. These are the main facets of your document:
- Student Name:
- Project Name:
- Technology stack:
- Project Purpose:
- Features list:
- Features Breakdown:
- Narrative description
- User stories
- Database description (including entity map)
- Dataflow diagrams
- Wireframes
- Project Timeline
What you are creating are the instructions a developer would follow in order to build the feature you are describing. It is the scope of the feature and includes all of the information a developer would need to build it. What I have put in this handout are examples of the elements of these descriptions to give you some guidance about what I expect.
One of the key purposes of this assignment is to help you develop a mental model of what a content management system is. Mental models are a powerful set of expectations about how we see things in the world. For example: an automobile. Automobiles are ubiquitous in our world – there is no city in the world that has not spent untold billions of time, effort, and wealth, in making their city automobile friendly. Some of us can drive an automobile – all of us have been in one and have a good idea of how it works. Therefore, if I asked you to describe an automobile you would be able to do a decent job of it: even if you don’t drive. The same is true for this assignment and what we are doing in the program in general. However, most of you have never done this kind of work before and so your mental model needs to be developed. That is the purpose of you doing this assignment.
Student Name
This seems obvious – but make sure your name is on the project wherever it can be. This includes file names, emails, the requirements document itself. There should be no doubt who the author is.
Project Name (and version)
This is more than Student X capstone project. It is the narrative and informative title for the project. It is ok to be a bit flashy and exuberant with the project name: Jasdeep's Excellent Bixi Bike Finder. Or Mohamed's Amazing Vegan Recipe Builder. It may happen that your document will be revised before you implement it. If that is so – you will have to start adding version numbers. So the file name might be – sen-lui-requirements-v201-2023.docx or
jay-dave-http-capstone-v-2a-2002.docx. You can pick your versioning pattern – but stick to just one.
Technology Stack
What are you using to create your project? It could be anything – ASP.net using MVC. WordPress using LAMP. The MERN stack. Take your pick but you have to declare it here. Similarly, if you are incorporating third-party APIs, list them here.
Project Purpose
This is your project in plain English, something anyone could understand. Here you will describe what the project is, who the project is for, the features it will have, and how it will work.
Features List
This will be a bullet-point list of the discrete capabilities your project will have. They will be categorized into Must Have features, Should Have features, then, Nice-to-have features.
Following the list of features will be a detailed breakdown of each feature:
Narrative Description
Similar to the project purpose this is your feature in plain English. What are you building and how will it work? How will the various users interact with your application? About 250 or so words per separate feature.
User Stories
You will write out the user stories that will provide the means of showing what your features will do for the different access levels of your users. User stories are a key element for knowing what the user will be able to do with your feature. For example; a user story for a frequently asked question feature would be:
A logged in Admin user can add a frequently asked question.
Or for a job application feature:
A registered Volunteer can apply for a volunteer position.
If we break these stories down, we can see what needs to be in place for them to work. In the first story we have a logged in admin user so we will need a login system and a means of distinguishing different types of users. User permissions will also need to be in place. It is important to identify the access roles that you will create for your user groups. The second part can add a frequently asked question means that we have a form and a mechanism for adding a question. This might mean a link in admin side that says something like Add new or Add new question. HTML forms have fields of various types, validation, and code that interacts with the server and the database.
In the second story we have a Registered user which means that users can register and further confirms a mechanism for providing user rights and permissions. We can also infer a form to submit an application as well as a means of reviewing applicants – this is based on the word apply.
Remember too that all applications have to have CRUD capability. Each element of CRUD is a user story. This section is also a good place to show what error and success messages you will have for your feature. You do want to have these system messages in place before you start programming. These messages are a key element of the user experience – we all know how impossible it is to use a system with messages that are not easy to understand. We are building features that our audience will want to use.
CRUD is a short form for Create, Read, Update, and Delete. These are the common database functions that are the basis for content management. Every feature for every Web site in the world will have some or all aspects of CRUD and yours will too. Your project is expected to be able to at least manage CRUD operations in a way that you describe.
Database Description
In this section you will determine what information you intend to collect. You will also show the tables you will create to support your feature. In each table you will begin to denote which data fields are required by a setting of not null. This is in turn will be seen in the wireframes where you will mark fields that are required.
Excel is probably the best means to show your database tables – but any clear means of showing the tables, their connections, and their details is fine. Below is a possible schema for the MVP for a CMS driven Web site.
Table Name
| Field | Type |
|---|---|
| id | int |
| foreign_id | int |
| word | varchar |
| text | text |
Dataflow Diagrams
We use these diagrams to explain how the feature will work. We model the interaction using boxes, diamonds, and arrows. In one sense each box is a page, the diamonds describe decision points, and the arrows show us the flow of the interaction. Each element of CRUD requires a dataflow diagram – these will be for primarily administrative functions. Although if your feature has public functions – then these will also require a dataflow. Within the dataflow you will also add messages, either success, failure, or status, to show what the message says and how it is triggered. Each dataflow diagram will start with a user story to show what the user will be able to do and to act as the test for that part of the feature. If the user can do what the story says in your application – then you know you are finished.
Take a look at the example below. This is a dataflow for the create element of CRUD for the MVP. The user story tells you that this is for an admin user who has logged in. There may be several routes to the add new functionality – this will depend on how you have managed the admin dashboard for the CMS. The first step is The new page form loads. And from there the admin user can enter the data they have prepared. At this point they click Submit (which is something to be careful about – make sure you have determined what buttons are to be called – so that you consistently use the same name.). Once the user clicks submit – then the data is validated – this is represented by the diamond. A yes response means to keep moving while a No requires the feature to take the user back – with an informative error message. Error messages are in red while success messages are in green. The interaction finishes with the new page displayed – or you can go back to the admin dashboard – whatever you have decided.
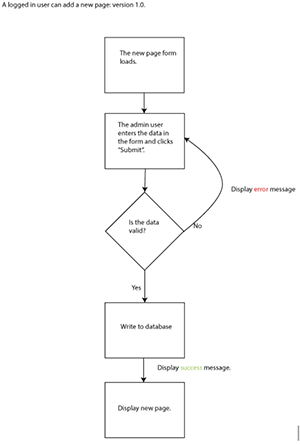
This is the dataflow for Create – read, update, and delete would be next. Read is simple – and doing a Read dataflow is not always needed – it depends on the interaction. Update would look identical – except this time the admin user would be pulling in the form filled in with the data to be edited. Delete is different – rather than a validation diamond you would have a confirmation diamond – this would be a status message (in yellow) asking the user if they were sure they wanted to delete the record. You can expect to have between 4 and 10 dataflow diagrams depending on the feature you are describing. You may also consider that a responsive or an accessible version might require a change in the interaction – if that is the case – dataflow diagrams reflecting responsive (or accessible) interactions may be needed.
Wireframes
From a broad perspective the point of these documents is to go from very loose descriptions to very tight requirements: programming the feature itself is the most specific of all. Our narrative description is in English and is not very specific. Then our database is logical but not very useful in telling us how the feature will work: it is simply what data will be collected and how. The dataflow diagrams require us to be more exact in how the feature will work, what goes first, what goes next, and how error, success, and status will be handled. The wireframes are our first attempt to show how the feature will look. The wireframes will show forms, outputs, and views. The arrangement of the data from the database on the screen. They will also show how errors will be displayed and what fields are required.
This is the Read view of a page of content.
This is the view of the HTML form that produces the Read view above. If the form is blank – then it is a Create wireframe and if the form is filled – it is an update wireframe.
Here is the same form with an error in place. You would include the error message in this wireframe.
This wireframe is a view of all the records available for the admin users. The gray boxes refer to the page titles and the links on the right are Edit and Delete. Clicking on Edit retrieves the data from the database and places it into the form. Clicking on Delete will trigger the delete functionality. You could either load the page and then confirm deleting it or just show the confirmation message.
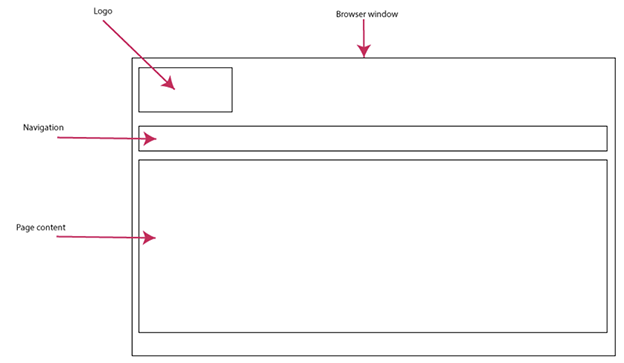
Your wireframes will be more complex than these. You will build a home page wireframe. This wireframe will hold most of the navigation and the layout for the Web site. Your features will fit into the main wireframe.
Project Timeline (see provided document)
This document breaks down your plan on a weekly basis. What is your plan for execution across a timeline? Seven weeks is not a lot of time - make sure there is room for deployment and testing!
![]()